
Thought I would share another Giftie Tutorial with you this week. This one is pretty easy, one you may have already done. But I like to have small things to tuck into packages when I sell things, or if someone stops by to visit me. This may also be cute as Party Gifts for a Tea Party, For a Teacher, Mail lady, Etc.
Firstly, I made you a few tags from the Free Clip Art I posted last week. It was pretty easy as most of the Clip art I give you, I have already spent hours on cleaning them up :)

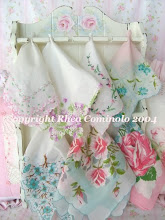
You can print them out onto card stock, punch a hole, add some ribbon and tie one on to the Gift Bag we are making this week. The small squares we will use on our craft. :)
Ok, First we will make our Sugar cubes. In a small bowl, I used about a cup of sugar, to two teaspoons water, and one half drop of food coloring.
 Mix it till it is like damp sand.
  Then you press it into a candy mold, and pack firmly. I have this Sweet Heart one that I am using.
  Let it dry several hours, to overnight. Then lay a tray on the mold and carefully turn it over to release the sugar cubes. There, Easy-McPeasy so far, Right ?
Grab some pretty Scrap papers for this next part. And some tea bags.
 Carefully remove the paper from the tea bags. This is your pattern.
  Flatten it and lay it onto some cute scrap paper and cut out the tea bag cover shape. I wouldn't suggest tracing with a pencil, as we don't want Lead anywhere near our tea. I add an extra 1/8" to 1/4" all the way around, so it fits the tea bag better. Then score and fold, reopen and run a light band of glue, with a glue-stick onto the paper and seal it.
  Wait till it is dry before inserting the teabag. ( Dont want glue on the tea either. And , WASH your hands before beginning this project. Lol !! Sorry, should have said that FIRST, Right ? )
Ok, now we have pretty sugars, AND a pretty wrapped tea bag. You can cut out and glue one of the little squares from above onto the cover too, if you want it to match your tag. For the Big Gift bag, add some paper shred, your sugars ( I like to put the sugars into their own wee bag ) , then a few teabags, maybe a tea bag holder, or Pretty Flea Market Tea cup. Tie a few bows onto the bag, add your tag, and Voila !

 And There you have a sweet little gift that didn't cost hardly anything but Love :)
 You can make bigger bags if you like. You can add a vintage linen napkin, a few cookies or English biscuits, a small book of poems, or any other small "I am thinking of You" treasure.
Thank you So much for stopping by :) I really enjoy your visits. :) If you make any, please let me know so I can feature them on my blog. Or if you have any ideas to add to this, I would love to hear :)
I am joining Martha's Tea Time Tuesday this week :)
Hugs,
Rhea


35 comments:
Hi Rhea! This is so special. I just love how sweet and beautiful. Who wouldn't be thrilled to receive something so pretty and the packaging is just the cherry on the cake. It's almost the best part.
Thanks for sharing the tutorial with us. Hugs...Tracy :)
Your tutorial is wonderful. Such a cute and lovely project. Thanks so much. Happy Tea Day!!!
Thanks for this great project. What an adorable little gift to share with someone special.
Hi Rhea,
You are so creative! What a lovely gift idea! The sugar hearts are absolutely adorable and your tutorial was wonderful. I loved your little gift cards and the tea tag is very cute too. Thank you so much for sharing this with us. You've given me some ideas. I invite you to stop by for Tea Time and I wish you a lovely week.
Blessings,
Sandi
LOVE this!! I make sugar shapes, (have TONS) of molds) but never thought of the tea-bags! GREAT idea!! Thank you for sharing it!!
Oh, that is just the sweetest thing! Thank you so much Rhea for sharing this beautiful tutorial!
Hi Rhea: What a wonderful post. I learned so much. I always wondered how to make those sugar cubes. You make it look so easy. I am going to try it. Have a wonderful week. Blessings, Martha
Hi Rhea,
This is really cute, thank you for sharing. You might want to stop by and see how your "little Girl" sculpt is doing.
Hugs,
Meri
what a sweet idea! I will definetly use this idea! I have a couple friends that are big tea drinkers!
xoxo
vivian
Hi Rhea :) This is wonderful! Love the heart shaped sugars you made. A truly wonderful and sweet project :)
Happy Tea Tuesday!!
Warmest hugs, Brenda
So special and sweet project, is a fantastic tutorial!! Thanks
Rhea~
What an adorable idea! I just love how you put it all together my dear! You certainly have gift!
I also am so pleased in seeing you in blogland more...I hope that means you are doing and feeling better!
We are all doing well, and making necessary adjustments to the many changes in our lives. G is commuting home on weekends, but that soon may change and he will be home more...it's a good thang! And a possible move is in our future, if the Lord plans.
I am destressing and finally able to do more creating! It is so freeing and wonderful to be out from under so much stress for now!
Hugs and much love!
Lorena
Rhea this is such a darling idea and how special would it be to get this as a little gift. I know I would be tickled pink!
bee blessed
mary
What a sweet gift :) Thanks so much for sharing your tutorial on this great project!
Hugs,
Robin
Rhea,
Thank you for sharing such a sweet, wonderful gift idea as a tutorial!
Blessings,
Cindy
This is so nice! I love the idea! Have a wonderful week! Twyla
Miss Rhea,
What a lovely idea! Thank you so much for sharing with us. I plan on using this idea for a friend of mine, she will just love it.
Blessings,
Sonya
Hi Rhea, so personal, so cute and it reflects the love for the one whom you will give this gift, very clear tutorial and what a great idea Rhea, Thanks a lot for sharing it with us... I never know how to make these sugar cubes.thanks a lot dear..
Take a look at me at
http://craftaworld.blogspot.com/
Love Farah
What a precious idea! Love it! Thanks for always sharing, Rhea!
Big TX Hugs,
Stephanie
Angelic Accents
Oh Rhea.. this is so much fun tutorial! thanks for sharing and my daughter would love to make the heart shape sugar cubes! wonderful idea!
xo
fitty
Rhea I love this! I am going to try this for my Aunties this weekend. :)
You are so generous to share so much with your readers! Your tut is fab, as well as your beautiful tea cup. I love how dainty it is.
Thank you for sharing in Tea Cup Tuesday.
Hugs,
Terri
Rhea,
Thank you so much for the sweet little tutorial.
Just a little something I can use to make my holiday tea parties a little bit more festive.
Hugs,
Penny
hi Rhea,
Just a quick HI ... Love the tea bag makeover and I have made those little sugar cubes! Yours are so pretty!
Warmly,
ddeb :)
Thank you for the tags, sugar cube tutorial and the lovely gift ideas.
I love your post today. I must try these sugar cube pink hearts and make lots as gifts. How very special to have a homespun X-mas.
Thank you, Miss Rhea!You are so creative and thoughtful. I think of you and pray for you often ~ I'm glad you're feeling well enough to post and I pray even better. Have a lovely and blessed day!
Dear Miss Rhea,
I just love this tutorial post of yours for this week's Teacup Tuesday! ~ What utterly charming and fabulous ideas you have shared with us, from those sweet little molded sugars, to your gift tags.., Love this!
Please feel most warmly welcome to also pop by for a tea visit soon in my little corner of, 'Tuesday And Wednesday Teatime In Blogland'!
..,This week marks my 54th, 'Tuesday Tea For Two', blog teaparty. ~ I'd love to share yet another Tuesday Tea heartwarming visit and cup of tea with you!
Cheers and hugs from Wanda Lee
@ http://theplumedpen.blogspot.com
and also @ http://silkenpurse.blogspot.com
Oh my goodness!! These turned out BEAUTIFULLY!! I thought you said this was an easy one? There's no way I could make this come out so well! You have the magic touch!
Patricia :o)
Hi Rhea,
Love this idea! These are so darling! Thank you so much for sharing this great tutorial with us. You must be feeling better!
Hugs,
Debbie
HELLO RHEA,
THIS JUST THE SWEETEST IDEA!!! HOW ADORABLE ARE THOSE SUGAR HEARTS I WILL HAVE TO TRY SOME :) THANKS!! WHAT AN AWESOME AND FUN LOVING POST :)
IF YOU HAVE TIME PLEASE STOP BY MY BLOG, I'M HOSTING MY VERY FIRST GIVEAWAY :)
XO~MARI
simply splendid!
Thank you so much for sharing such a beautiful idea. I am planning a Winter Tea party in January and these would be so perfect!
How adorable! This is so nice, and what a beautiful gift it would make. It's so feminine, just perfect for a female gathering.
Thanks for sharing! And your site is just beautiful!
Hi Miss Rhea! Love this beautiful idea for gift giving!.. and then your tips on how to wrap it all up so elegantly! Thank you, thank you, thank you!!! ~tina
Post a Comment