
3 1/2 cups of granulated sugar
1/2 cup powdered sugar
1 egg white, well beaten

 Make sure you beat the egg well and mix the two sugars really well before you add the egg.
It should feel like damp sand when you are through blending.

Pack into your egg mold, I use cake molds, as I wanted a smaller egg, but Wilton has all sizes, so check them out. Then level them with a frosting knife and pack hard again.

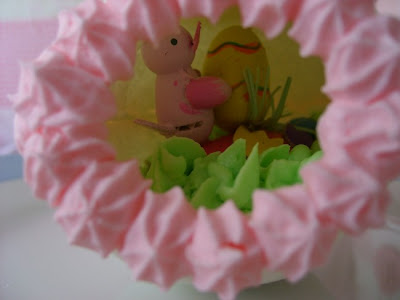
 Cover the mold with a plate, or other flat surface and quickly invert to unmold each egg. Remove the mold. If you use this particular mold, you will have to gently turn your eggs to face each other, smaller sides in.
 Then cut about and inch and a half or so of the tip off and push them together. You want the outer shell to dry, while keeping the inner damp. Let dry about three hours or so.
 Then scoop out the centers, leaving at least a quarter inch all the way around, then let dry ( upside down ) till completely dry.
 If the edges on your egg are rough, you can use a bit of sandpaper to smooth them. Ok, Now we can decorate !!! Here is the recipe for the royal frosting I used. :
8 cups powdered sugar
1 teaspoon cream of tartar
5 egg whites at room temperature
a variety of paste food coloring colors
Combine all the ingredients and beat at a high speed for 7-10 minutes , but do not over beat. The icing should be quite stiff and glossy looking. Add any food coloring during the last few minutes of the mixing. Paste coloring is better as it will not ruin the consistency of the icing. If the icing is not stiff enough, add more sugar. Mine was too stiff, so I added a few drops of water.
 And Decorate !!! Add your decoration to the inside with icing "glue" and add icing to the rim as glue to hold the two halves together. It is better to let the assembled egg dry for an hour before adding the outer frosting.

I decided to do this tutorial today in honor of Miss Sandy's Spring Easter Parade Party at Quill Cottage, Go say Hi !!!
Hugs,
Rhea


51 comments:
Beautiful.... As a child, I would always get a sugar egg each Easter…
I loved the little vignette inside.
Happy Spring,
Louise
OH RHEA!!! These are awesome! Thank you so much for sharing this. Yours are so beautiful!!
Love you,
Amy
Oh my gosh they are so cute but WAY too much work for this old gal.
Oh my goodness!! This is the best tutorial. I have always wanted to make these and yours is so beautiful. Thank you for sharing this.
Happy Easter!
Nancy
Wow, that looks fun Rhea. How long do they keep? How much cream of tartar in with the beginning sugar mold part? Did I miss that? Thanks for doing this.
Karen
Thnak you so much for this tutorial! I love this! I have two little panoramic sugar eggs I've saved for many years and display every Easter, but I'd love to make more.
I'm going to buy a egg mold pan and little decorations and do this craft for next Easter
Happy Spring and Blessed Easter
Hugs, Pat
How splendid! I had no idea that these could be done at home. Oh dear...I'm running out of time! ;>
Thank you for the very special tutorial!
I have always wanted to make one of these Eggs, growing up it brings back
memories of one of my favorites Thank
you for sharing and have a blessed Easter Pinkie Denise
Those are fantastic! I've never done them but that was a great tutorial. I may do some next year. Thank you, gorgeous lady, for that explanation.
Smoochies,
Connie
Rhea that was a gret tutorial! Now to just find the time to make some. The little wood toys are very hard to find too, but I will keep looking!
Shirl
Shirls Rose Cottage
Thank you so much for sharing this tutorial. I have always wondered how these eggs were made! I am running out to by a cake mold and some "glue"! Looks so fun! Love your blog and love your Etsy site ~ such beautiful creations. I check everyday :) Blessed Easter!
Jan Olson
Oh how beautiful
Alison
Oh Wow! You make that look so easy Rhea! They turned out beautiful too!
How cool is that? I always wondered how that what done! Wow. Thanks for an awesome tutorial.
Love your blog too.
c
Happy Easter Parade!
What a wonderfu Easter egg tutorial. thank you so much for sharing this with us.
Have a Happy Easter
Karen
Thanks so much for the tutorial! I've always loved these eggs! Yours are Fabulous!
Have a Blessed and Creative Day!
Lennea
The eggs are just toooo sweet , you did such a wonderful job ! Will have to give them a try sometime .. Thank you for visiting my blog & Have a blessed Easter !!
Thank you Miss Rhea, I want to make some of these sweet lil eggs!
Maybe after Easter.
Have a Blessed Easter sweet friend!
Luvs ya, Dolly
Very Wonderful Sugar Egg. What a great homemade easter display.
I've always wondered how those were made, thanks!
Oh Miss Rhea..they are lovely..and you are talented..Tis NOT easy to do!!
smiles to you, deena
i love your easter eggs! How fun! Thanks for sharing and stopping by my blog!
Jenny
Rhea that is an amazing demonstration and your results are stunning! You are soooo talented!
xo
mary
hoganfe handbags
Miss Rhea, that is the cutest thing i ever saw!!! thank you so much for this truly wonderful tutorial!!!
have a Blessed Easter!!!
I used to do these years ago. I had forgotten how much work they were. Your's is lovely!! Thanks for bringing back fond memories!
Bertie
Aunt May's Cottage
Thank you so much for the great tutorial...Rachel Ray better watch out!! They are so beautiful....just like the ones the See's Candy Bunny would leave in my basket every year.
Karen Eileen
What a great tutorial! Pictures look good enough to eat - yum! Your blog is beautiful and I loved reading about your family and love of ministry. Thanks for visiting my blog! Have a blessed Easter! katie
I am just awed by your talent!! The egg is lovely! Thank you for sharing this recipe. I am shopping tomorrow and am going to be on the lookout for an egg mold. Barbeque chicken - yummy! I am sorry you and family are not feeling well. I hope next week finds you much better. Have a Blessed Easter!
Rhea, they are beautiful, thanks for sharing, I'd rather purchase yours, than do all that work! lol
Hello Rhea, Thank You for sharing
the instructions for your
Beautiful Eggs!!!
I have this pan, also have a lg.egg pan. I have some Wilton Meringue Powder, I will try that in
the frosting. It said 2 tsp M.P. to
2 Tbsp. water = 1 egg white.
It will be later when I have time...
Thank You for visiting:) Have a Wonderful Easter,Hugs Mary:)
Mmmm- sugar high just from looking at the pictures- how pretty!
Rhea, I absolutely love that tutorial. I had no idea how those were made. Every child wants one of the gorgeous eggs. I know I did and still do!
Thank you for sharing.
xoxo
Cath
Wow! Those are really beautiful! Thank you so much for sharing this. I am a terrible cook, but it is fun to watch someone else work such gourmet Easter magic!
That is the cutest thing I've ever seen! Thanks for that tutorial, and thanks for your sweet comments, too. Have a BLESSED Easter weekend!
Cheryl
They are so impressive! Loved looking at how you made them.
Hi, Miss Sandy here, thank you for joining the Easter Parade! I cannot wait to try this! Thank you for such clear concise instructions and photos! I have seen these for sale before and when I was a child my grandmother bought me one, I kept it until it turned a sickly brown and my mom made me throw it away afraid it would draw ants! I had no idea you could make them yourself! I want to make them for my little grandson. I'll let you know how they turn out! Have a blessed Easter!
What beautiful eggs. I will have to try this.
Hi Rhea,
Just wanted to stop by and wish you and your family a very blessed and happy Easter weekend. I'll try to catch up later!
Hugs,
Hope
wow. My neighbor used to make these when I was a little girl. I thought then and still do think that they are so beautiful. I had no idea this was how they were made. You have made such wonderful creations!
Wow...it has taken me forever to get to your blog on this Easter Parade....geesh...but the wait was worth it...
Oh My Goodness Rhea your sugar Easter Eggs are AMAZING. I have always admired these in the fancy stores and you make them. I'm so impressed with such detail, I'm loving it!
Looking down through your older posts, I was so blessed by all the wonderful things you make, I love your style, I must say.
Happy Easter, Can't wait to see what you do for Christmas :0
Fabulous eggs! My mom used to make those when I was growing up.
Hope you and your family have a wonderful Easter.
Blessings,
Sandy :)
Oh my, oh my, oh my, now that's the kind of wonderful treat I think of doing, but never follow through and do. I've never made 'em, my mom never made 'em, but RHEA actually makes 'em. I'm awed.
Happy Easter,
Devonia
Hi Rhea, So nice to see this still done. We made these many years ago. Enjoyed your post, they are beautiful! Just wanted to wish you a very Happy Easter.
hugs,
Celestina,
La Rea Rose
Oh Rhea, Thanks a bunch will play around with the recipe and be ready for next year! Question, do you save them from year to year? If so how. Happy Belated easter, love,Lori
Thank you for the "How To" can't wait to try it. Vicki Page
Thank you so much for your recipe. I Wondered how you made them. They are so beautiful. Hugs /linnea-maria
Oh how fun , thanks for sharing!
I intend to print that out and give it a try next spring, while I am over in Japan and my shopping is limited! I will need lots of things to keep me busy!!!
I just saw this post and tutorial
and wish I would have seen it before
Easter.. I have always wanted to make sugar eggs.. I think I made them as a
child and have always wanted to share with my children. I will have to
try to make them next Easter. Thank
you for sharing with us.. I love your
blog and inspiration...
Thanks for posting this. Even though Easter is over, I really want to try this!! :)
-Sarah
wow! GORGEOUS!!! i WISH i had the patience to attempt these... =) debbie
I have a sugar egg that I bought 5 years ago and it was made in the 1930,s and is still beautiful. I display it every year, So beautiful Trisha
Post a Comment